-40%
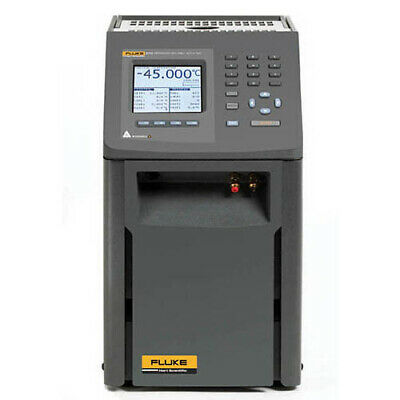
Fluke Calibration 9170-DW-156 Field Dry-Well Metrology Calibrator
$ 6417.55
- Description
- Size Guide
Description
Subscribe to Our NewsletterFluke Calibration 9170-DW-156 Field Dry-Well Metrology Temperature Calibrator with INSX (No Insert), -45 °C to 140 °C
Brand:
Fluke Calibration
Model No:
9170-DW-156
Ref No:
3015925
Our Model No:
9170DW156
Product Overview
Features
Temperature range (at 23 °C ambient): -45 °C to 140 °C (-49 °F to 284 °F)
Display accuracy: ±0.1 °C full range
Stability: ±0.005 °C full range
Axial uniformity: ±0.1 °C at -45 °C; ±0.04 °C at -35 °C; ±0.02 °C at 0 °C; ±0.07 °C at 140 °C
Radial uniformity: ±0.01 °C full range
Immersion depth to 203 mm (8 in.)
Combines bath-level performance with dry-well functionality and legitimate reference thermometry
Bring lab-quality performance into whatever field environment you might work in
Description
The Fluke Calibration 9170DW156 Field Dry-Well Metrology Temperature Calibrator with INSX (No Insert), -45 °C to 140 °C lets you bring lab-quality performance into whatever field environment you might work in. New analog and digital control techniques provide stability as good as ±0.005 °C. And with dual-zone control, axial (or "vertical") uniformity is as good as ±0.02 °C over a 60 mm (2.36 in.) zone.
There are six critical components of performance in an industrial heat source (which the European metrology community explains, for example, in the document EA-10/13): calibrated display accuracy, stability, axial (vertical) uniformity, radial (well-to-well) uniformity, impact from loading, and hysteresis. Fluke Calibration added a seventh in the form of a legitimate reference thermometer input and created an entirely new product category: Metrology Wells.
Display Accuracy
Dry-wells are typically calibrated by inserting a calibrated PRT into one of the wells and making adjustments to the calibrator's internal control sensor based on the readings from the PRT. This has limited value because the unique characteristics of the reference PRT, which essentially become "calibrated into" the calibrator, are often quite different from the thermometers tested by the calibrator. This is complicated by the presence of significant thermal gradients in the block and inadequate sensor immersion into blocks that are simply too short.
Metrology Wells are different. Temperature gradients, loading effects, and hysteresis have been minimized to make the calibration of the display much more meaningful. We use only traceable, accredited PRTs to calibrate Metrology Wells and our proprietary electronics consistently demonstrate repeatable accuracy more than ten times better than our specs, which range from ±0.1 °C at the most commonly used temperatures to ±0.25 °C at 661 °C.
Stability
Heat sources from Fluke Calibration have long been known as the most stable heat sources in the world. It only gets better with Metrology Wells. Low-temperature units are stable to ±0.005 °C over their full range. Better stability can only be found in fluid baths and primary fixed-point devices. The "off-the-shelf controllers" used by most dry-well manufacturers simply can't provide this level of performance.
Axial Uniformity
The EA-10/13 document suggests that dry-wells should include a zone of maximum temperature homogeneity, which extends for 40 mm (1.54 in.), usually at the bottom of a well. Metrology Wells, however, combine our unique electronics with dual-zone control and more well depth than is found in dry-wells to provide homogeneous zones over 60 mm (2.36 in.). Vertical gradients in these zones range from ±0.02 °C at 0 °C to ±0.4 °C at 700 °C.
Radial Uniformity
Radial uniformity is the difference in temperature between one well and another well. For poorly designed heat sources, or when large-diameter probes are used, these differences can be very large. For Metrology Wells, we define our specification as the largest temperature difference between the vertically homogeneous zones of any two wells that are each 6.4 mm (0.25 in.) in diameter or smaller. Cold units provide radial uniformity of ±0.01 °C.
Loading
Loading is defined as the change in temperature sensed by a reference thermometer inserted into the bottom of a well after the rest of the wells are filled with thermometers, too.
For Metrology Wells, loading effects are minimized for the same reasons that axial gradients are minimized. We use deeper wells than found in dry-wells. And we utilize proprietary dualzone controls. Loading effects are as minimal as ±0.005 °C in the cold units.
Hysteresis
Thermal hysteresis exists far more in internal control sensors than in good-quality reference PRTs. It is evidenced by the difference in two external measurements of the same set-point temperature when that temperature is approached from two different directions (hotter or colder) and is usually largest at the midpoint of a heat source's temperature range. It exists because control sensors are typically designed for ruggedness and do not have the "strain free" design characteristics of SPRTs, or even most PRTs. For Metrology Wells, hysteresis effects range from 0.025 °C to 0.07 °C.
Immersion Depth
Immersion depth matters. Not only does it help minimize axial gradient and loading effects, it helps address the unique immersion characteristics of each thermometer tested in the heat source. Those characteristics include the location and size of the actual sensor within the probe, the width and thermal mass of the probe, and the lead wires used to connect the sensor to the outside world. The Model 9170-DW-156 is 160 mm (6.3 in.) deep to facilitate temperature of -45 °C.
Other Great Features
A large LCD display, numeric keypad, and on-screen menus make use of Metrology Wells simple and intuitive. The display shows the block temperature, built-in reference thermometer temperature, cutout temperature, stability criteria, and ramp rate. The user interface can be configured to display in English, French, or Chinese.
The 9170-DW-156 comes with an RS-232 serial interface and the Model 9930, Interface-it software. It is also compatible with Model 9938 MET/TEMP II software for completely automated calibrations of RTDs, thermocouples, and thermistors (Metrology Wells with built-in reference input options will be compatible with MET/TEMP II in early 2006).
Even without a PC, Metrology Wells have four different preprogrammed calibration tasks that allow up to eight temperature set points with "ramp and soak" times between each. There is an automated "switch test" protocol that zeros in on the "dead-band" for thermal switches. And a dedicated °C/°F button allows for easy switching of temperature units.
Any of six standard inserts may be ordered with the unit, accommodating a variety of metric- and imperial-sized probe diameters. And Metrology Wells are small enough and light enough to go anywhere.
Included Components
1 - Power Cord
1 - RS-232 Cable
1 - Getting Started Guide
1 - User Manual
1 - Report of Calibration and Calibration Label
1 - Well Insulator
1 - Insert Removal Tool
1 - 9930 Interface-it Software
Terms & Conditions
Please note estimated delivery time above. Contact us for details or if you have a delivery requirement. We ask for your patience while striving to ensure your shipment arrives quickly and accurately.
Domestic Shipping
FREE Standard Shipping on items OVER and less than 30lbs to continental U.S. Add for AK, HI, or PR. Please contact us for shipping rates to any overseas US territories including: Northern Mariana Islands, Guam, Puerto Rico, U.S. Virgin Islands and American Samoa.
PO Boxes/APOs require USPS shipping and may therefore experience longer lead times
6.25% Sales Tax for shipping to MA
International Shipping
Due to international voltage requirements, please ask us prior to purchasing to confirm your product will operate correctly in your country.
Please contact us for shipping rates to any overseas U.S. territories.
International customers are responsible for all shipping charges, including any duties or taxes.
